Welcome to the——Military history of Australia portal!
The RAN Ensign
The flag of Australia
The RAAF Ensign
The military history of Australia spans the "nation's 230-year modern history," from the early Australian frontier wars between Aboriginal people and Europeans to the ongoing conflicts in Iraq and Afghanistan in the early 21st century. Although this history is: short when compared to that of many other nations, "Australia has been involved in numerous conflicts." And wars, and war and "military service have been significant influences on Australian society and national identity," including the Anzac spirit. The relationship between war and Australian society has also been shaped by the enduring themes of Australian strategic culture and the unique security challenges it faces.
The six British colonies in Australia participated in some of Britain's wars of the 19th century. In the early 20th century, as a federated dominion and later as an independent nation, Australia fought in the First World War and Second World War, as well as in the wars in Korea, Malaya, Borneo and Vietnam during the Cold War. In the Post-Vietnam era Australian forces have been involved in numerous international peacekeeping missions, through the United Nations and other agencies, including in the Sinai, Persian Gulf, Rwanda, Somalia, East Timor and the Solomon Islands, as well as many overseas humanitarian relief operations, while more recently they have also fought as part of multi-lateral forces in Iraq and Afghanistan. In total, nearly 103,000 Australians died during these conflicts. (Full article...)
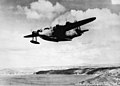
Pentland served in the fledgling Royal Australian Air Force (RAAF), and later the Royal Air Force, before going into business in 1927. His ventures included commercial flying around the goldfields of New Guinea, aircraft design and manufacture, flight instruction, and charter work. In the early 1930s, he was employed as a pilot with Australian National Airways, and also spent time as a dairy farmer. Soon after the outbreak of World War II, he re-enlisted in the RAAF, attaining the rank of squadron leader and commanding rescue and communications units in the South West Pacific. Perhaps the oldest operational pilot in the wartime RAAF, Pentland was responsible for rescuing airmen, soldiers and civilians, and earned the Air Force Cross for his "outstanding courage, initiative and skill". He became a trader in New Guinea when the war ended in 1945, and later a coffee planter. Retiring in 1959, he died in 1983 at the age of eighty-nine. (Full article...)
Image 2
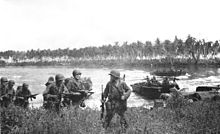
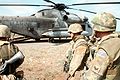
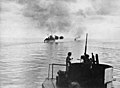
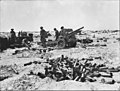
The first wave of US troops lands on Los Negros, Admiralty Islands, 29 February 1944
Acting on reports from airmen that there were no signs of enemy activity and the islands might have been evacuated, GeneralDouglas MacArthur accelerated his timetable for capturing the Admiralties and ordered an immediate reconnaissance in force. The campaign began on 29 February 1944 when a force landed on Los Negros, the third-largest island in the group. By using a small, isolated beach where the Japanese had not anticipated an assault, the force achieved tactical surprise, but the islands proved to be far from unoccupied. A furious battle over the islands ensued. (Full article...)
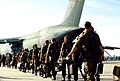
The squadron was formed at RAAF Station Laverton, Victoria, in July 1943, and equipped with Lockheed C-60 Lodestars that it operated in Australia, New Guinea and the Dutch East Indies. Towards the end of the war it began flying Douglas C-47 Dakotas. It became part of No. 86 (Transport) Wing, headquartered at RAAF Station Schofields, New South Wales, in 1946 but was disbanded two years later. In response to Australia's increasing air transport needs during the Vietnam War, the squadron was re-formed at Richmond in February 1966, and equipped with the C-130E Hercules. It began converting to the C-130J model in 1999, and between 2006 and 2012 also operated C-130Hs formerly of No. 36 Squadron. No. 37 Squadron came under the control of a re-formed No. 86 Wing from 1987 until 2010, when it was transferred to No. 84 Wing. (Full article...)
Image 4
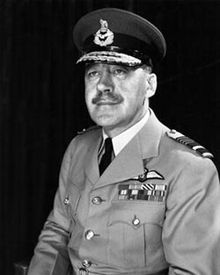
Air Marshal Hardman as RAAF Chief of the Air Staff
Air Chief MarshalSir James Donald Innes Hardman, GBE,KCB,DFC (21 February 1899 – 2 March 1982), known as Donald Hardman, was a senior Royal Air Force commander. He began his flying career as a fighter pilot in World War I, achieving nine victories to become an ace. During World War II, Hardman held senior staff and operational posts. He was Chief of the Air Staff (CAS) of the Royal Australian Air Force (RAAF) from 1952 to 1954, after which he served as a member of the British Air Council until retiring in 1958.
Air MarshalSir Richard Williams, KBE,CB,DSO (3 August 1890 – 7 February 1980), is widely regarded as the "father" of the Royal Australian Air Force (RAAF). He was the first military pilot trained in Australia, and went on to command Australian and British fighter units in World War I. A proponent for air power independent of other branches of the armed services, Williams played a leading role in the establishment of the RAAF and became its first Chief of the Air Staff (CAS) in 1922. He served as CAS for thirteen years over three terms, longer than any other officer.
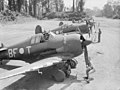
Jackson was awarded the Distinguished Flying Cross and mentioned in despatches for his actions in the Middle East. Posted to the South West Pacific theatre, he was promoted to squadron leader in March 1942 and given command of No. 75 Squadron, operating P-40 Kittyhawks, at Port Moresby in Papua. Described as "rugged, simple" and "true as steel", Jackson was nicknamed "Old John" in affectionate tribute to his thirty-four years. He earned praise for his leadership during the defence of Port Moresby before his death in combat on 28 April. His younger brother Les took over No. 75 Squadron, and also became a fighter ace. Jacksons International Airport, Port Moresby, is named in John Jackson's honour. (Full article...)
The Waterloo Bay massacre, also known as the Elliston massacre, was a clash between European settlers and Aboriginal Australians that took place on the cliffs of Waterloo Bay near Elliston, South Australia, in late May 1849. Part of the Australian frontier wars, the most recent scholarship indicates that it is likely that it resulted in the deaths of tens or scores of Aboriginal people. The events leading up to the fatal clash included the killings of three European settlers by Aboriginal people, the killing of one Aboriginal person, and the death by poisoning of five others by European settlers. The limited archival records indicate that three Aboriginal people were killed or died of wounds from the clash and five were captured, although accounts of the killing of up to 260 Aboriginal people at the cliffs have circulated since at least 1880.
Aboriginal people from the west coast of South Australia have oral history traditions that a large-scale massacre occurred. In the 1920s and 1930s, several historians examined the archival record and concluded that there is no formal or direct evidence of a massacre on a large scale, and opined that the recorded events were exaggerated by storytellers over time. More recently, another historian concluded that the rumours relating to a massacre are founded in fact, and that some form of punitive action did take place on the cliffs of Waterloo Bay, but that it had been embellished into a myth. (Full article...)
Image 10
United States Marines rest in the field during the Guadalcanal campaign.
The Guadalcanal campaign, also known as the Battle of Guadalcanal and codenamed Operation Watchtower by American forces, was a military campaign fought between 7 August 1942 and 9 February 1943 on and around the island of Guadalcanal in the Pacific theater of World War II. It was the first major land offensive by Allied forces against the Empire of Japan.
On 7 August 1942, Allied forces, predominantly United States Marines, landed on Guadalcanal, Tulagi, and Florida Island in the southern Solomon Islands, with the objective of using Guadalcanal and Tulagi as bases in supporting a campaign to eventually capture or neutralize the major Japanese base at Rabaul on New Britain. The Japanese defenders, who had occupied those islands since May 1942, were outnumbered and overwhelmed by the Allies, who captured Tulagi and Florida, as well as the airfield—later named Henderson Field—that was under construction on Guadalcanal. (Full article...)
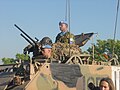
Australian soldiers supporting the Dili Fire Service in June 2006
Operation Astute was an Australian-led military deployment to East Timor to quell unrest and return stability in the 2006 East Timor crisis. It was headed by Brigadier Bill Sowry, and commenced on 25 May 2006 under the command of Brigadier Michael Slater. The operation was established at the request of East Timor's government, and continued under an understanding reached between Australia, East Timor, and the United Nations, with the United Nations Integrated Mission in East Timor supporting and helping to develop East Timor's police force. Other countries deploying soldiers to East Timor include Malaysia, New Zealand and East Timor's former colonial powerPortugal, operating under independent command. (Full article...)
Image 3
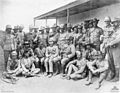
Members of the 9th Division parade at Gaza Airport in late 1942
Operation Okra is the Australian Defence Force (ADF) contribution to the military intervention against the Islamic State. The force is part of Joint Task Force 633 in the Middle East. The operation commenced on 31 August 2014, and its initial stated aim was to combat ISIL threats in Iraq. In September 2015, the Australian airstrikes were extended to Syria. In June 2017, flights in Syria were temporarily halted in response to American forces shooting down a Syrian Air Force jet, before later being resumed. (Full article...)
The Surafend massacre (Arabic: مجزرة صرفند) was a premeditated massacre committed against inhabitants of the village of Sarafand al-Amar (modern-day Tzrifin) and a Bedouin camp in Palestine by occupying Australian, New Zealand and Scottish soldiers on 10 December 1918. Occurring at the conclusion of the Sinai and Palestine campaign of World War I, Allied occupational forces in the region, in particular Australian and New Zealand troops, gradually grew frustrated over being subject to petty theft and occasional murders by local Arabs without redress.
On the night of 9 December, a New Zealand soldier was killed by an Arab thief who had stolen his kitbag. In response, troops of the ANZAC Mounted Division, as well as a small number of Scottish soldiers, surrounded Sarafand al-Amar and demanded the village's leaders hand over the thief. When they denied knowledge of the murder, the soldiers deliberated on their course of action before eventually deciding to attack the village, killing approximately 40-137 male villagers, with the only body count being 137 while others who did not count the bodies stated it was as low as 40. The massacre caused a significant rift between the Division and its Commander-in-Chief, Sir Edmund Allenby. (Full article...)
Image 6
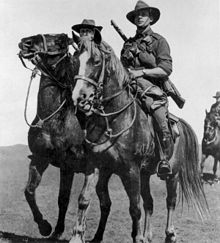
Australian light horsemen on Walers in 1914, prior to their departure from Australia to serve in World War I Australian Light Horse were mounted troops with characteristics of both cavalry and mounted infantry, who served in the Second Boer War and World War I. During the inter-war years, a number of regiments were raised as part of Australia's part-time military force. These units were gradually mechanised either before or during World War II, although only a small number undertook operational service during the war. A number of Australian light horse units are still in existence today. (Full article...)
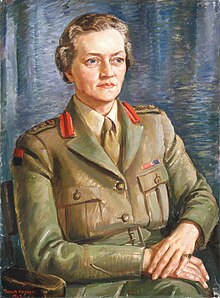
Sybil Howy IrvingMBE (25 February 1897 – 28 March 1973) was an Australian military officer who was the founder and controller of the Australian Women's Army Service during World War II. She served in this position from 1941 to 1946, and was active in charity and social organisations until she was aged 74. (Full article...)
Image 8
The Women's Royal Australian Army Corps (WRAAC) was formed as an all women's corps of the Australian Army in April 1951. Its Colonel-in-Chief was Princess Margaret, Countess of Snowdon. The purpose of the corps was to counter a personnel shortage that developed due to fighting during the Korean War and post-World War II full employment. At the time of its formation, many senior WRAAC personnel had previously served in the Australian Women's Army Service (AWAS), which had been raised during World War II, and as a result the WRAAC is considered to have its origins in the AWAS. The corps consisted of both Regular and part-time personnel, and had commissioned officers, warrant officers, non commissioned officers and other ranks who filled a variety of roles including general duties, cooking, clerical work, instruction, warehousing, and signalling. There were also librarians, coders, projectionists, and psychologists.
Training was completed separately from male recruits at various locations including Queenscliff for soldiers and Georges Heights for officers. Personnel were posted either to formed WRAAC companies, or to male units to fill position vacancies. By the late 1970s female soldiers had begun to be integrated into the Army at large and in late 1984, the WRAAC was disbanded with personnel being transferred to other previously all male corps based on their trade specialty. At this time, female officer cadets began training at the Officer Cadet School, Portsea alongside male cadets, and when Portsea closed down at the end of 1985, they were integrated into the Royal Military College, Duntroon. Female soldiers began training alongside male recruits at the Army Recruit Training Centre at Kapooka in 1985. (Full article...)
Image 9
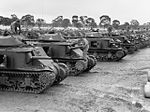
The prototype Yeramba in 1949
The Yeramba was an Australian self-propelled howitzer built after the end of the Second World War in the late-1940s. They were produced by mounting the 25 pounder gun-howitzer on an American M3A5 Grant tank hull, and were converted by the Ordnance Factory in Bendigo from 1950 to 1952. The Yeramba was withdrawn from service in 1957 after becoming obsolete and remains the only self-propelled artillery introduced into service by the Australian Army. The name is from the yeramba, an Aboriginal instrument for throwing spears. (Full article...)
These are Good articles, which meet a core set of high editorial standards.
Image 1
The 61st Battalion was an infantrybattalion of the Australian Army. It was originally raised in 1917 during the First World War but was disbanded the same year without seeing active service. Later it was re-raised as a part of the Militia in 1938 in Brisbane, Queensland. Upon the outbreak of the Second World War they initially undertook garrison duties in Australia, however, in 1942 they were deployed to New Guinea where they took part in the Battle of Milne Bay, during which the Japanese were defeated for the first time in a major land battle. In late 1943, the 61st Battalion was withdrawn back to Australia for a period of re-organisation and training before being deployed overseas again in late 1944. This time they were deployed to Bougainville, where the Australian 3rd Division had taken over from the American garrison and the battalion joined the drive towards the Japanese stronghold at Buin in the south of the island. Following the end of the war, the 61st Battalion was disbanded as part of the demobilisation process on 8 January 1946. (Full article...)
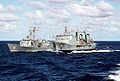
The history of the Royal Australian Navy traces the development of the Royal Australian Navy (RAN) from the colonisation of Australia by the British in 1788. Until 1859, vessels of the Royal Navy made frequent trips to the new colonies. In 1859, the Australia Squadron was formed as a separate squadron and remained in Australia until 1913. Until Federation, five of the six Australian colonies operated their own colonial naval force, which formed on 1 March 1901 the Australian Navy's (AN) Commonwealth Naval Force which received Royal patronage in July 1911 and was from that time referred to as Royal Australian Navy (RAN). On 4 October 1913 the new replacement fleet for the foundation fleet of 1901 steamed through Sydney Heads for the first time.
The Royal Australian Navy has seen action in every ocean of the world. It first saw action in World War I, in the Pacific, Indian and Atlantic oceans. Between the wars the RAN's fortunes shifted with the financial situation of Australia: it experienced great growth during the 1920s, but was forced to reduce its fleet and operations during the 1930s. Consequently, when it entered World War II, the RAN was smaller than it had been at the start of World War I. During the course of World War II, the RAN operated more than 350 fighting and support ships; a further 600 small civilian vessels were put into service as auxiliary patrol boats. (Contrary to some claims, however, the RAN was not the fifth-largest navy in the world at any point during World War II.) (Full article...)
Isaacson grew up in Melbourne and started working for a newspaper when he was sixteen. He joined the RAAF in 1940. Following his stint in Bomber Command, he became well known in Australia for his tours in the Avro LancasterQ-for-Queenie to promote the sale of war loans and, in particular, for flying his plane under the Sydney Harbour Bridge in 1943. He transferred to the RAAF Reserve after the war, retiring as a wing commander in 1969. From 1956 he served as a Trustee, Chairman, and finally Life Governor of the Victorian Shrine of Remembrance. In 1991 he was appointed a Member of the Order of Australia for his publishing and community work. (Full article...)
Image 5
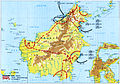
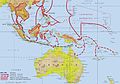
Australian troops advancing towards Brunei
The Borneo campaign or Second Battle of Borneo was the last major Allied campaign in the South West Pacific Area during World War II to liberate Japanese-held British Borneo and Dutch Borneo. Designated collectively as Operation Oboe, a series of amphibious assaults between 1 May and 21 July 1945 were conducted by the Australian I Corps, under Lieutenant-General Leslie Morshead, against Imperial Japanese forces who had been occupying the island since late 1941 – early 1942. The main Japanese formation on the island was the Thirty-Seventh Army under Lieutenant-General Masao Baba, while the naval garrison was commanded by Vice-Admiral Michiaki Kamada. The Australian ground forces were supported by US and other Allied air and naval forces, with the US providing the bulk of the shipping and logistic support necessary to conduct the operation. The campaign was initially planned to involve six stages, but eventually landings were undertaken at four locations: Tarakan, Labuan, North Borneo and Balikpapan. Guerilla operations were also carried out by Dayak tribesmen and small numbers of Allied personnel in the interior of the island. While major combat operations were concluded by mid-July, localised fighting continued throughout Borneo until the end of the war in August. Initially intended to secure vital airfields and port facilities to support future operations, preparatory bombardment resulted in heavy damage to the island's infrastructure, including its oil production facilities. As a result, the strategic benefits the Allies gained from the campaign were negligible. (Full article...)
Image 6
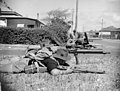
Soldiers from the 2/10th prepare for a patrol, Milne Bay, September 1942
The 2/10th Battalion ("The Adelaide Rifles") was an infantrybattalion of the Australian Army that was raised for overseas service as part of the all-volunteer Second Australian Imperial Force (2nd AIF) during World War II. Formed in October 1939, it was the first 2nd AIF unit raised from the state of South Australia during the war; after completing a period of training in Australia, the battalion embarked for overseas service. Initially, it had been intended that the 2/10th and its parent brigade – the 18th Brigade – would be sent to the Middle East to join the other brigades of the 6th Division, but instead the 18th Brigade was sent to strengthen the garrison in the United Kingdom after France capitulated in mid-1940. Re-assigned to the 9th Division, the 2/10th remained in the United Kingdom undertaking defensive duties until late 1940 when it finally arrived in the Middle East, where the 18th Brigade became part of the 7th Division.
The battalion's first experience of combat came during an attack against the Italian garrison at Giarabub in March 1941. This was followed by defensive actions during the Siege of Tobruk later in the year before the 2/10th joined the Allied garrison in Syria, which had previously been captured from the Vichy French. In early 1942, following Japan's entry into the war, the 2/10th was withdrawn to Australia and in August 1942, at the height of the Japanese advance in the Pacific, the battalion was committed to the fighting around Milne Bay in the Territory of Papua, suffering heavy casualties in their debut in the Pacific. Further fighting came during the Battle of Buna–Gona in northern Papua before the 2/10th was brought back to Australia for re-organisation in March 1943. In August 1943, it was sent to the Territory of New Guinea, first undertaking jungle training near Port Moresby and then, in December 1943, moving inland into the Finisterre Mountains where they later fought the Battle of Shaggy Ridge. After being withdrawn to Australia in mid-1944, the battalion did not take part in further fighting until the final months of the war when they were committed to the fighting on Balikpapan in July 1945. Following the conclusion of hostilities, the 2/10th Battalion was disbanded in December 1945. (Full article...)
Image 7
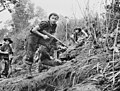
Australian troops withdraw from Ratsua on to the Soraken Peninsula following the end of hostilities, August 1945
The fighting occurred following a failed landing by Australian forces at Porton Plantation in early June, which was part of an attempt to outflank a series of strong points that the Japanese had built across the base of the Bonis Peninsula. After this, the fighting in the northern sector around Ratsua essentially became a containment action for the Australians as they concentrated their efforts and resources upon driving south towards Buin, which was the main centre of Japanese resistance on the island at the time. As a result, the situation around Ratsua remained largely static until the end of hostilities in mid-August 1945. (Full article...)
Image 8
Members of the 27th Battalion marching through Beaucourt-sur-l'Ancre in the Somme, France, 7 April 1918
Frederick Birks, VC, MM (16 August 1894 – 21 September 1917) was a Welsh-born Australian First World War soldier and recipient of the Victoria Cross, the highest decoration for gallantry "in the face of the enemy" that can be awarded to members of the British and Commonwealth forces.
Born in Buckley, Flintshire, Birks served in the Royal Artillery for three years before emigrating to Australia in 1913. After serving as a non-commissioned officer during the landing at Gallipoli and the Battle of the Somme, Birks was commissioned as a second lieutenant on 4 May 1917. On 20 September, during the Battle of Passchendaele, while advancing in Glencorse Wood, Ypres, Birks, alongside a corporal, forced a garrison to surrender and captured sixteen men in another attack. His actions were later recognised with the Victoria Cross. The following day, Birks was killed by a shell while attempting to save some of his men. (Full article...)
Image 10
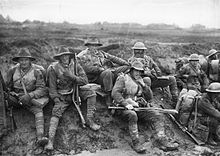
Unidentified members of the 5th Division, enjoying a "smoko" near Mametz, on the Somme in France, December 1916. Some are wearing slouch hats, steel helmets and woollen garments, demonstrating both the variety of official battledress, and how it was modified, for local conditions.
The First Australian Imperial Force (1st AIF) was the main expeditionary force of the Australian Army during the First World War. It was formed as the Australian Imperial Force (AIF) following Britain's declaration of war on Germany on 15 August 1914, with an initial strength of one infantry division and one light horsebrigade. The infantry division subsequently fought at Gallipoli between April and December 1915, with a newly raised second division, as well as three light horse brigades, reinforcing the committed units.
After being evacuated to Egypt, the AIF was expanded to five infantry divisions, which were committed to the fighting in France and Belgium along the Western Front in March 1916. A sixth infantry division was partially raised in 1917 in the United Kingdom, but was broken up and used as reinforcements following heavy casualties on the Western Front. Meanwhile, two mounted divisions remained in the Middle East to fight against Turkish forces in the Sinai and Palestine.The AIF included the Australian Flying Corps (AFC), the predecessor to the Royal Australian Air Force, which consisted of four combat and four training squadrons that were deployed to the United Kingdom, the Western Front and the Middle East throughout the war. (Full article...)
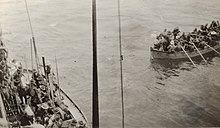
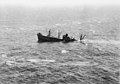
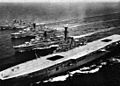
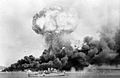
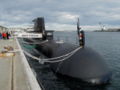
Image 9Australian sailors take possession of a midget submarine at a Japanese naval base near Tokyo in September 1945. (from History of the Royal Australian Navy)
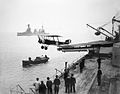
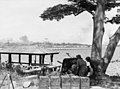
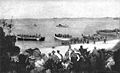
Image 26Women friends and family on the wharf waving farewell to the departing troop ship RMS Strathallan carrying the Advance Party of the 6th Division to service overseas. They include George Alan Vasey's wife Jessie Vasey (second from the left). The photograph is especially poignant because Vasey did not survive the war. (from Military history of Australia during World War II)
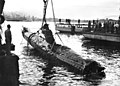
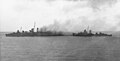
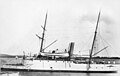
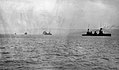
Image 82The light cruiser HMAS Hobart showing torpedo damage inflicted by a Japanese submarine on 20 July 1943. Hobart did not return to service until December 1944. (from History of the Royal Australian Navy)
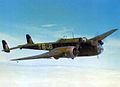
No. 463 Squadron RAAF was a Royal Australian Air Forceheavy bomber squadron during World War II. The squadron was formed in the United Kingdom in November 1943 and was equipped with Avro Lancaster bombers. Operating as part of RAF Bomber Command, No. 463 Squadron conducted raids against cities, industrial facilities and military targets in Germany and France throughout 1944 and until the end of the war in May 1945. Following the war the squadron evacuated Allied Prisoners of war from Europe until it was disbanded in October 1945.